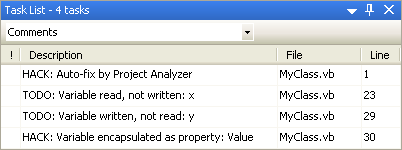
Auto-fix integrated with the Visual Studio Task List
Enterprise Edition only
The following dialog opens up to define the options for Problem auto-fix.
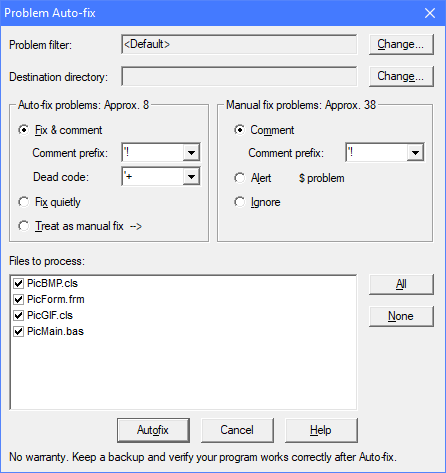
Problem filter. Select the problems that you want to handle. Ignore problems that you don't care about. Press the Change button to select a filter.
Destination directory. Select a new, empty directory where you want to generate the fixed code. If the original files were located in more than one directory, the directory tree will be recreated under the selected directory. If the original files were located on different drives, the new directory tree will contain sub-directories named after the original drives.
All source files, solution items and related files will be copied to the destination directory or directory structure. The original files are left intact. No files will be overwritten or deleted. Note that any http references will be converted to local file references. This affects .NET web projects.
Files to process. In this list you select which source files to process through auto-fix. Files not selected will be copied without modifications. If a source file is not in the list, there is nothing to do for that file and it will be copied as is.
Auto-fix problems. This selection tells Project Analyzer how to handle auto-fixable problems.
Fix & comment. Fix problems and add a comment. Comment out dead code. Use this option to learn how auto-fix works. The Comment prefix field defines the comment sequence to use for adding comments on what was auto-fixed. The Dead code field defines how to comment out dead code automatically.
Fix quietly. Fix problems, leave no comment. Delete dead code. Use this option when you're familiar with auto-fix or when you want to remove dead code without leaving a trace.
Treat as manual fix. Treat auto-fixable problems the same way as manual fix problems — do not attempt an automatic fix. Use this option to generate a commented project to handle all changes manually.
Manual fix problems. This selection tells Project Analyzer how to handle manually fixed problems.
Comment. Add problem descriptions in code as a comment. You can define which comment prefix to use, see below. Use this option if you have lots of problems to handle.
Alert. Add problem descriptions in code, preceded by the $ sign. VB will not compile the code until all these problems are fixed. Use this option when you have just a limited number of problems and you want to achieve gold quality.
Ignore. Don't do anything. This option doesn't add any comments for manual fix problems, it just quietly ignores them all. Use this option in combination with either Fix & comment or Fix quietly on the auto-fix side. This way you can handle all automatically fixable problems, and not care about those ones that require a manual fix. This option is the quickest way to polish your code without manual intervention. Run a new analysis later to take care of the rest of the problems.
You can define which comment prefix to use for auto-fix and manual fix problems. The selected prefix will be written in your code along with the description of the problem that was or should be fixed. You can also set up a prefix for commenting out dead code, in which case the code will simply be commented out with that string. Some of the prefixes you could use are:
| '! | This is the default comment for VB Classic code. You can search for '! in VB and go through the items one by one to see what Auto-fix did to your project. |
| '+ | This is the default for commenting out dead code. You can search for '+ in VB to review what was removed. |
| ' | This is an alternative way to comment out dead code. It's handy if you may want to uncomment the code back later. |
| 'HACK: | This is the default auto-fix comment for VB.NET. It will show up in the Task List of Visual Studio .NET. 'HACK: indicates that Project Analyzer provided you with an automated hack. You might want to review the modification to tell if it was all right. |
| 'TODO: | This is the default manual fix comment for VB.NET. It will show up in the Task List of Visual Studio .NET. 'TODO: indicates that you should handle this problem manually. |
| 'UNDONE: | This prefix will show up in the Task List of Visual Studio .NET. You can use it in place of 'TODO: if you prefer. |
| 'FIXED: | Indicates an auto-fixed problem. This prefix will not show up automatically in the Task List. See below for how to enable it. |
| 'REVIEW: | Indicates a manual fix problem that you should review and handle. This prefix will not show up automatically in the Task List. See below for how to enable it. |
You can define your own prefixes (such as 'FIXED: or 'REVIEW: ). Add a space at the end of the prefix to make your code look better. Besides, Visual Studio .NET requires the colon be followed by a space, otherwise the comment won't show up in the Task List.
Custom prefixes for Task List. You can make Visual Studio .NET (2002 and later) notice your own prefixes and bring them up in the Task List. You do this in the Options dialog (available in the Tools menu in Visual Studio). Open up Environment|Task List, write your own prefix name in the Name field and click the Add button. In Visual Studio 2005 and 2008 you may need to enable the checkbox Show all options first.
Auto-fix integrated with the Visual Studio Task List
Your options for dead code removal are here:
Notice that dead code that cannot be removed automatically will be treated according to the manual fix options regardless of which auto-fix options you use.