Pro and Enterprise Edition only
Project Printer is a document generator. With it, you can quickly accomplish the following tasks.
Project Printer is not just a plain ordinary code printer. Depending on the selected options, you can have a lot of information inserted in the document and get the results in several formats.
First analyze a project fully. Start Project Printer by selecting it from the Pro menu. Project Printer works after analysis phase 1/2, but you get the most out of it after the entire analysis is complete.
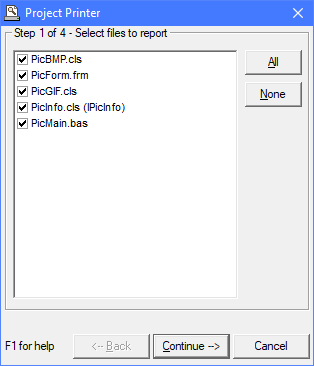
First you select the files to include on your report. You probably usually want to document your entire program and select all files. If you want, you can also create partial documentation by selecting only those files you need.
Click for the next step.
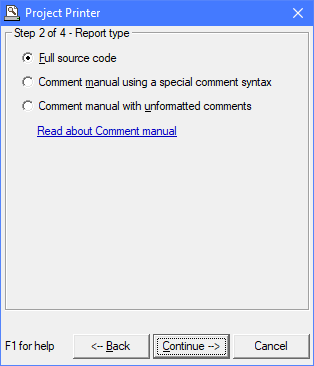
You have three report types to choose from:
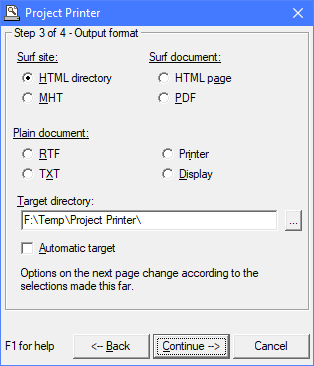
The output format selection defines the type of documentation you will get.
When the Automatic target checkbox is selected, Project Printer will automatically select the output directory for you. You can also set the target directory/file by yourself.
The output format you select impacts the options available on page 4/4. Experiment to learn the best format for you.
| Output format | Source code style | Comment manual style | Links | Uses |
|---|---|---|---|---|
| HTML directory | Code web site (sample) | Web site | Yes | Document entire system as a web site. Publish on intranet/ |
| MHT | Code web site (in 1 file) |
Web site (in 1 file) |
Yes | Document entire system as a web site (single file, multiple pages). Send to your colleagues. Keep as reference. Optionally include reports. |
| HTML page | Code web page | Web page document | Yes | Send docs to your colleagues. Publish code on intranet/ |
| Code document | Document | Yes | Print formatted source code or comments. Send docs to your colleagues. Publish code on intranet/ |
|
| RTF, TXT | Code document | Document | No | Use as basis for writing technical documentation. |
| Printer | Code print-out | Print-out | No | Print formatted source code or comments. |
| Display | Code document | Document | No | Quick preview. |
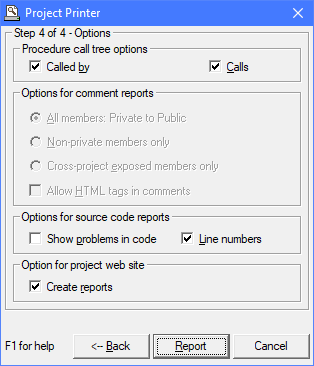
The report type and output options you chose in the previous steps dictate which options are enabled and what the default values are in the 4th step.
Called by, Calls. Check these options to generate a list of incoming and/or outgoing procedure calls in your document after each procedure.
These options allow you to leave private implementation details out of your comment manuals. For source code documents, all code is always included regardless of scope. It doesn't usually make sense to document only public procedures, since their functionality is often depends on private ones.
Allow HTML tags in comments. This option allows you to utilize HTML tags for formatting your comment manual. Check this option if you want the tags to have their special meaning, such as <B> for a bold comment. Leave this option unchecked if you want to see the tags as HTML/XML source. Also leave unchecked if you use XML documentation comments (.NET). This option works only for HTML comment manuals, not for HTML source reports.
Show problems in code. You can show programming problems inline within the source code. The problems shown are the same as those in the problem view at the bottom of Project Analyzer's main screen. They're included according to the currently selected problem filter. This option is useful for code reviews, for example. You can determine which problems to fix by reading through your code. Or, you may want to check this option for code web sites, so that your colleagues can learn which places need a fix.
Line numbers. This option displays line numbers to the left of the code.
Create reports. This option includes a set of reports on the site. The reports are based on the entire analysis regardless of which files you have selected in step 1 of 4 above. Tip: Certain reports may fail on very large systems due to out of memory conditions. If Project Printer should fail, run it with this option unselected.
To set the font, use Font options. HTML and MHT modes are an exception. In these modes, you control the font via HTML options.
To control the colors used in source code, use the Hypertext options dialog in the Options menu.
You can control the appearance of HTML and MHT output. You do it via HTML options and Hypertext options in the Options menu of the Project Analyzer main window.
The most versatile output formats are the HTML and MHT project sites. You can create a project site for surfing the code (complete with reports) or a Comment manual site as technical documentation. You can even compile the web site as a .chm file.
The appearance of the HTML directory and the MHT file is similar. The difference between these formats is the number of files generated. For MHT it is 1, for HTML directory the number of files may be very large.
An HTML directory may contain thousands of files for a medium-sized project. The start page is named index.html. Open it to surf the site.
You can compile the HTML directory site to a single .chm file. You need the free Microsoft HTML Help Workshop for this. A .chm file looks just like the web site, but it offers a search capability, is easy to distribute and takes less disk space. How to compile: When the HTML directory site is complete, see the directory for file report.hhp (HTML Help Project). Double-click the file and compile it in HTML Help Workshop. We have tested this feature with Help Compiler Workshop v4.74. Note: This feature is not designed to generate an end-user help file. It is designed to provide technical documentation for your program.
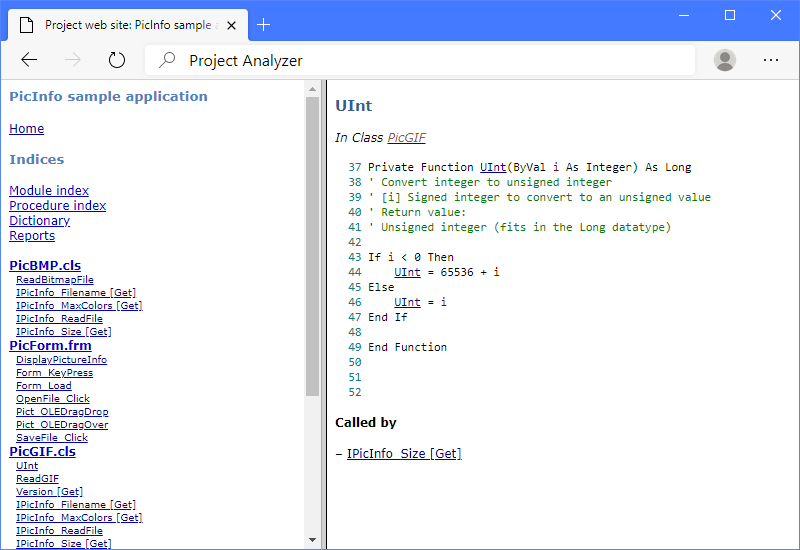
The links in HTML and MHT formats support a hidden feature. If you keep the mouse pointer hovering over a highlighted word or a link, you get some additional information about it. Put your mouse over PicSize in the code snippet below to see this effect.
15 Dim PicSize As TPicSize
16 Dim MaxColors As Variant
Project Printer's output appears in the same order the code appears in your files. If you need your code sorted, use a 3rd-party sort utility before running Project Printer.
So why doesn't Project Printer sort the code? Sometimes the readability of code is better in non-alphabetical order. This is especially true if you have written comments between procedures. If you use the Full Module View option in VB6, or you write VB.NET code, you decide by yourself how you wish to order your code. In fact, in VB.NET, this is a necessity, and you can even write variable declarations etc between procedures. That's why we chose not to sort.
Comment manual is a document based on the comments in your code.
Print or export source code. Project Printer is designed for documenting an entire system or a large part of it. Project Analyzer also allows you to print individual files (or shorter code snippets) or export code to syntax-enhanced text files.